lolipopでログイン認証処理を設定する
cakephp3でauth componentを設定した際の手順を説明します。
cakephp3では、始めからauthコンポーネントが実装されていますので、呼び出すだけで認証システムができます。簡単・便利で素晴らしいですね。
コントローラーの修正
src/Contoroller/UsersController.php
|
1 2 3 4 5 6 7 8 9 10 11 12 13 14 15 16 17 18 19 20 21 22 23 24 25 26 27 28 29 30 31 32 33 34 35 36 37 38 39 40 41 42 43 44 45 46 47 48 49 50 51 52 53 54 55 56 57 58 59 60 61 62 63 64 65 66 |
use Cake\Event\Event; class UsersController extends AppController{ /** * initialize */ public function initialize(){ // Flashコンポーネント。エラーメッセージの表示などに使用 $this->loadComponent('Flash'); // RequestHandlerコンポーネント。入力されたデータの取得などに使用 $this->loadComponent('RequestHandler'); // authコンポーネント。遷移先の設定など $this->loadComponent( 'Auth',['loginRedirect' => ['controller' => 'users','action' => 'index'], 'logoutRedirect' => ['controller' => 'users','action' => 'login'], 'authenticate' => ['Form' => ['fields' => ['username' => 'email', 'password' => 'password']]], 'authError' => 'ログインできませんでした。ログインしてください。', ]); //session $this->Session = $this->request->session(); } /** * beforeFilter */ public function beforeFilter(Event $event){ parent::beforeFilter($event); $this->Auth->allow(['login', 'logout']); } /** * login(認証が不要なページ) */ public function login(){ if($this->request->is('post')) { // Postされたユーザー,パスワードをもとにDBを検索、該当するユーザーがreturnされる. $user = $this->Auth->identify(); if ($user) { // 該当するユーザーがいればログイン処理 $this->Auth->setUser($user); return $this->redirect($this->Auth->redirectUrl()); } else { // 該当するユーザーがいなければエラー $this->Flash->error('ユーザー名又はパスワードが間違っています'); } } } /** * ログアウト(認証が不要なページ) */ public function logout(){ // セッションの破棄 $this->request->session()->destroy(); // ログアウト処理 return $this->redirect($this->Auth->logout()); } } |
①initialize関数で、コンポーネントの呼び出し・設定を行います。
ここでは、認証に必要なユーザーID部分をメールアドレスに変更しています。
|
1 2 3 |
'authenticate' => ['Form' => ['fields' => ['username' => 'email', 'password' => 'password']]], |
この部分、『’fields’ => [‘username’ => ‘email’』ですね。
②beforeFilter関数で、authコンポーネントの効かないアクションを設定します。
※最初のユーザー作成の際、addアクションの関数を追加して、ユーザー作成後は外してくださいね。
|
1 2 3 |
$this->Auth->allow(['login', 'logout', 'add']); |
③loginアクションの関数を作成します。
④logoutアクションの関数を作成します。
テンプレートの作成
src/Template/Users/login.ctp
|
1 2 3 4 5 6 7 8 9 10 11 12 13 14 |
<!-- コンテンツ --> <div class="users index large-9 medium-8 columns content"> <?php echo $this->Flash->render() ?> <?php echo $this->Form->create() ?> <fieldset> <legend><?= __('メールアドレスとパスワードを入力してください。') ?></legend> <?php echo $this->Form->control('email') ?> <?php echo $this->Form->control('password') ?> </fieldset> <?php echo $this->Form->button(__('ログイン')); ?> <?php echo $this->Form->end() ?> </div> |
テンプレートを作成します。説明は要らないかな。
Entityの修正
src/Model/Entity/Users.ctp
|
1 2 3 4 5 6 7 8 9 10 11 12 |
use Cake\Auth\DefaultPasswordHasher; class User extends Entity{ // パスワードのハッシュ化を行う protected function _setPassword($password){ if (strlen($password) > 0) { return (new DefaultPasswordHasher)->hash($password); } } } |
パスワードのハッシュ化の為に追記します。
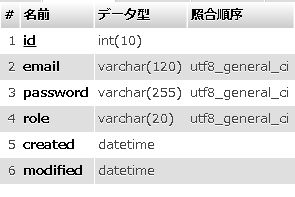
テーブルの設定

上の画像のようになっていればokです。
注意点
ログインできない時は、DBのpasswordのカラムの長さを確認してください。varcharの255になっていれば良いと思います。私はこれで半日嵌りました…
実行
最後に、https://xxxxx.jp/users/loginのように呼び出します。

